Skip to content
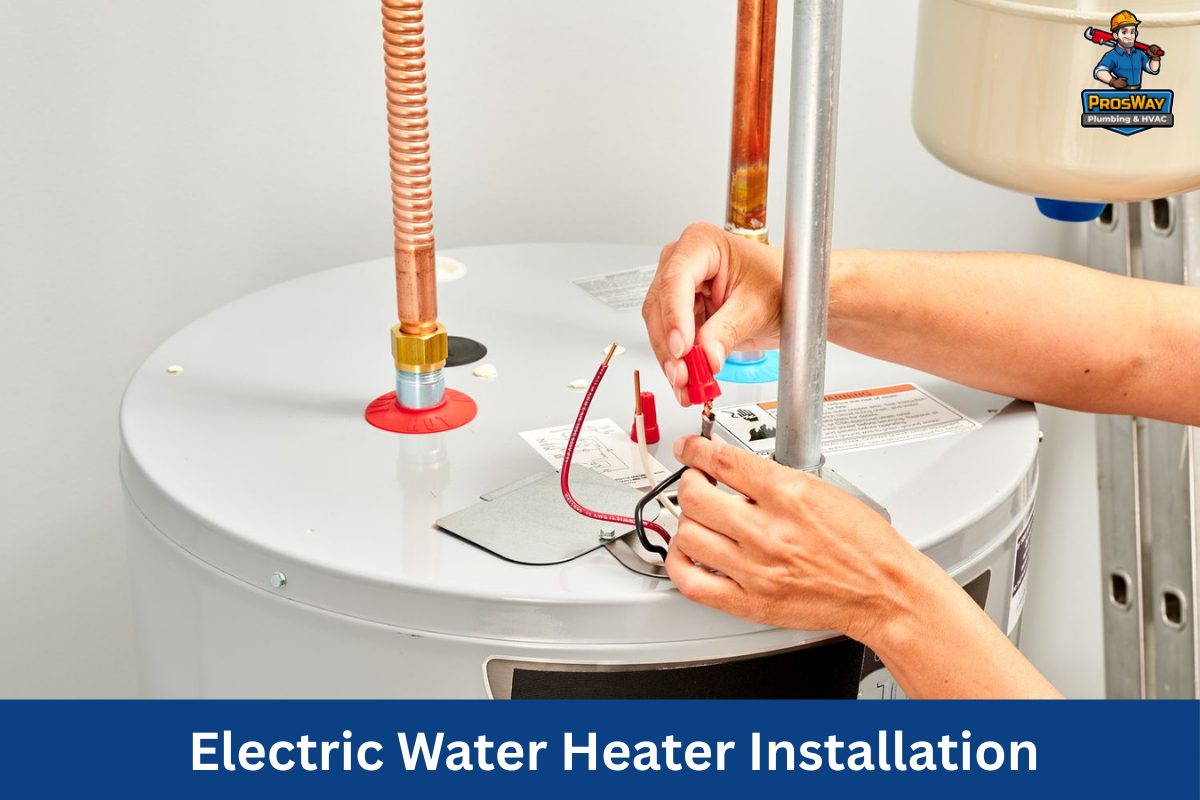
Electric water heaters have become a go-to choice for many Northern New Jersey homeowners. They offer reliable performance, straightforward maintenance, and installation flexibility in homes without a natural gas supply. Even if you choose a tank electric water heater or a tankless electric model, both can deliver years of dependable service when installed correctly.
However, they don’t last a lifetime; their approximate life span is between 10 and 15 years. This guide will cover how to install an electric water heater, both tankless and tank models, including basic information such as installation requirements, tools you’ll need, and maintenance tips.
Tank vs. Tankless Models – Key Differences
Tank electric water heaters work by storing preheated water in an insulated tank, usually ranging from 30 to 80 gallons.
The heating elements maintain water temperature, and recovery rate, how fast the tank can reheat varies by model. These units are straightforward to install and can run on a dedicated 240-volt circuit.
Tankless electric water heaters use powerful heating elements to warm water instantly as it flows through the unit. This means endless hot water as long as the unit’s maximum GPM (gallons per minute) is not exceeded.
Their compact design saves floor space and eliminates standby heat loss, but they often require higher electrical capacity and precise installation to perform well.
A quick side-by-side view:
- Tank: Lower upfront cost, simpler electrical requirements, but limited by tank size.
- Tankless: Endless hot water, compact footprint, but requires proper sizing and higher electrical demand.
Before You Begin: Installation Requirements
Before an electric water heater installation, follow these installation requirements for a seamless process:
Electrical Requirements
Most electric water heaters, whether tank or tankless, require a dedicated 240-volt circuit. The breaker size and wire gauge must match the manufacturer’s specifications, often a double-pole breaker with 6 AWG or 8 AWG wiring for tankless models.
A ground wire connected to the unit’s ground screw is essential for safety. Before any work begins, the power must be shut off at the breaker, and a non-contact voltage tester should confirm that the circuit is de-energized.
Plumbing Connections
The cold water supply line connects to the inlet, while the hot water outlet delivers heated water to the home. Shut-off valves should be installed on both lines to make future maintenance easier.
Copper piping, PEX, or CPVC are common options, with dielectric unions used to prevent corrosion between dissimilar metals. Threaded connections should be sealed with PTFE tape.
Location Guidelines
Install the water heater in a location with adequate ventilation to manage moisture. Maintain at least six inches of clearance on all sides and follow minimum distance requirements from combustible materials.
The unit should be positioned for easy access to controls, the electrical access plate, and safety devices like the temperature and pressure relief valve. For tank models, placing a drain pan beneath the unit with a line to a floor drain is recommended.
Safety Codes and Permits in Northern New Jersey
Local building codes govern everything from electrical wiring to plumbing connections. In Northern New Jersey, permits are typically required for both installation and replacement. Only licensed professionals are authorized to perform certain electrical and plumbing work.
Compliance with the energy code ensures efficiency standards are met, while installation code requirements maintain safety. Always review manufacturer specifications and local code before starting.
Tools and Materials for Installing a Water Heater
- Adjustable wrench
- Pipe wrench
- Pliers
- Screwdrivers
- Drill
- Voltage tester
- Wire strippers
- Electrical cable
- Teflon tape
- Pipe sealant
- Isolation valves
- Fittings (compatible with piping type)
- Dielectric unions
- Mounting hardware (for tankless models)
- Safety glasses
- Personal protective equipment (PPE)
How to Install an Electric Tankless Water Heater?

Preparation
Before beginning, turn off the power to the tankless water heater circuit at the breaker panel. Use a non-contact voltage tester to verify that the power is off. Shut off the main water supply to the house and open a nearby faucet to relieve pressure in the lines.
Gather your tools and materials, checking the manufacturer’s specifications for both plumbing and electrical readiness. Ensure the location meets clearance requirements and offers easy access for future servicing.
Installation Steps
Follow these steps to install an electric tankless water heater:
1. Mount the Tankless Unit
First, mount the tankless unit securely to the wall using the provided hardware or brackets. The surface should be level, and the position should allow space for connecting water and electrical lines.
2. Connect the Water Lines
Next, connect the cold water inlet and hot water outlet to the appropriate ports on the unit. Isolation valves are strongly recommended.
This allows you to shut off water to the unit for maintenance without cutting off the supply to the whole house. Use PTFE tape or an approved sealant on threaded connections to prevent leaks.
3. Wire the Electrical Connections
With plumbing complete, connect the electrical wiring to the unit. This involves running the correct gauge wire from a dedicated double-pole breaker to the heater’s electrical access plate. Attach the ground wire to the designated ground screw inside the unit.
Follow the manufacturer’s wiring diagram exactly, as wiring mistakes can damage the unit or create hazards.
4. Restore Water Supply and Test
Once all connections are secure, restore the water supply and check for leaks. Open a hot water faucet to purge air from the system, then turn the breaker back on.
Set the thermostat to the desired temperature, 120°F is standard for safety and efficiency, and run water to confirm proper heating.
How to Install an Electric Tank Model
Preparation
Switch off the power to the existing water heater at the breaker panel. Use a non-contact voltage tester to confirm the circuit is off. If replacing an old tank, drain it completely by attaching a garden hose to the drain valve and directing the water to a safe discharge location.
Inspect the plumbing and electrical connections to ensure they are in good condition and compatible with the new unit.
Installation Steps
Below are the steps to install an electric tank water heater:
1. Position the Tank
Place the new water heater in its installation location. Maintain at least six inches of clearance on all sides and ensure it sits level. Use shims if necessary. For added safety, position a drain pan beneath the unit with a line to a floor drain to catch any leaks.
2. Connect the Water Lines
Attach the cold water inlet and hot water outlet to the unit using flexible water supply connectors or copper piping. Use dielectric unions when joining different metals to prevent corrosion. Seal threaded fittings with PTFE tape and confirm that shut-off valves are in place for both lines.
3. Install the Temperature and Pressure Relief Valve
Insert the T&P valve into the designated opening on the tank. Orient the relief valve discharge pipe toward the floor and connect it so it terminates within a few inches of the ground or directly to a floor drain, per local code.
Pro tip: Never reuse an old relief valve.
4. Make the Electrical Connections
Remove the electrical access plate and connect the wiring according to the manufacturer’s diagram. Use the correct gauge wire for the breaker size and connect the ground wire to the grounding screw. Replace the access plate once all connections are secure.
Fill the Tank and Test Heating
Open the cold water supply valve and allow the tank to fill before restoring power. Open a nearby hot water faucet to purge air from the lines until water flows steadily. Once the tank is full and all air is expelled, turn the breaker back on.
Set the thermostat to 120°F for safety and efficiency, then test for proper heating and check all plumbing connections for leaks.
Maintenance Tips

Tank Models
- Flush the tank at least once a year to remove sediment that can reduce efficiency and shorten lifespan.
- Test the T&P valve annually to ensure it operates correctly.
- Inspect the anode rod every few years and replace it if it’s significantly corroded. This protects the tank from internal rusting.
Tankless Models
- Descale the unit annually to prevent mineral buildup on the heating elements, especially in areas with hard water.
- Clean the inlet filters regularly to maintain water flow.
- Periodically check wiring and connections to ensure they remain tight and corrosion-free.
Final Thoughts
Choosing the right electric water heater and the proper electric water heater installation is key for safety, efficiency, and long-term performance. Tank models offer straightforward operation and lower upfront costs, while tankless models save space and provide endless hot water. Both require adherence to electrical and plumbing standards, clearances, and local code requirements to operate safely.
Ready for Hot Water Without the Hassle?
If you’re ready for professional water heater installation or water heater repair, Prosway Plumbing & HVAC can handle every step. Reliable professionals are available for same-day service. Call today to schedule your consultation and enjoy dependable hot water backed by expert installation.
Frequently Asked Questions
Can you install an electric water heater by yourself?
Yes, but it’s not recommended unless you are experienced with plumbing and electrical work. In Northern New Jersey, permits and code compliance are required, so it’s safer to hire a licensed professional.
How long does it take to install an electric water heater?
A professional installation usually takes 2–4 hours for a tank model and 4–6 hours for a tankless model, depending on electrical and plumbing setup.
What size electric water heater do I need?
It depends on your household size and hot water use. A family of four typically needs a 50-gallon tank or a properly sized tankless unit based on flow rate.
Do tankless electric water heaters need maintenance?
Yes. They should be descaled once a year and inlet filters cleaned to keep performance and efficiency high, especially in hard water areas.
What’s the average lifespan of an electric water heater?
Tank models last about 8–12 years, while tankless models can last 15–20 years with proper care.